Locally Managed Check Point 730 Static VPN to AWS
The steps in this article are being performed on a Check Point 730 running R77.20.60
A locally managed Check Point 730 does not support the advanced routing requirements necessary to configure both AWS tunnels as active. The main issue is that the VPN Topology and VPN Community features are unavailable and with no ability to tie a Tunnel Interface to a VPN Site having both active creates a route conflict. There are a series of steps around creating VPN Tunnel Interfaces and routes in the vpn config file, but we will skip all of those due to the limitations.
To setup a Static VPN the AWS requirements will be a static customer gateway along with a static VPN connection. Once the pre-requisites are setup on the AWS side you will be given a configuration file that will outline the following steps that you need to follow.
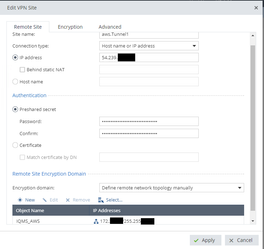
- Now we are going to configure the VPN Tunnel, go to VPN→VPN Sites and click New
- Set the Site name to the value from #3 Define Network Objects item 2
- Set the IP to the value from #3 Define Network Objects item 3
- Set the shared secret to #4 Internet Key Exchange item 10
- Set the Encryption domain to Define remote network topology manually, Click New and enter the Network and NetMask information for the VPC
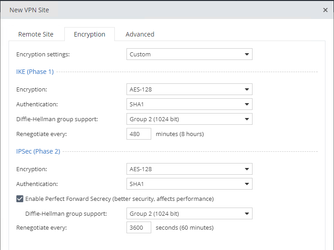
- Now go to the encryption tab, Select Custom Encryption Settings and enter the information in the below screen shot
- Now to to the Advanced tab and make sure Remote gateway is a Check Point Security Gateway is unchecked and Encryption method is IKEv1
- Repeat Step 1 for the second tunnel and then disable the tunnel after the site is created

At this point the configuration is done, in the event that the primary tunnel goes down for any reason you should be prepared to disable tunnel1 and enable tunnel2